
+
[op_liveeditor_element data-style=””][text_block style=”style_1.png” align=”left” font_color=”#000000″]Putting is simple, keep it that way!
Within this program you will be introduce to the key elements that all great putters possess. Have you ever noticed when a kid picks up a putter, they just grip it and hit it? Thats the mindset we all need to be in. Through this putting practice plan, I will show you all the secrets great putters know, without being technical.[/text_block][/op_liveeditor_element]
[op_liveeditor_element data-style=””][text_block style=”style_1.png” align=”left”]MUST SEE…
Video below is Aaron Baddeley describing his mindset on putting[/text_block][/op_liveeditor_element]
[op_liveeditor_element data-style=””]
[/op_liveeditor_element]
[op_liveeditor_elements][/op_liveeditor_elements]
+
[op_liveeditor_element data-style=””][text_block style=”style_1.png” align=”left”]PUTTING is very personal. Different grips, stances and crazy variations. Mindset is the most important.
– IF YOU ARE A GREAT PUTTER, KEEP DOING YOUR THING AND IGNORE US –
IF YOUR PUTTING HAS ROOM FOR IMPROVEMENT there are a few aspects that can help you getting your putting back on track.[/text_block][/op_liveeditor_element]
[op_liveeditor_element data-style=””]
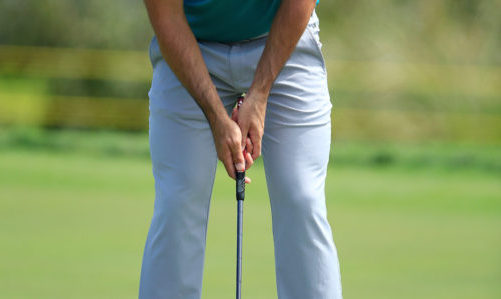
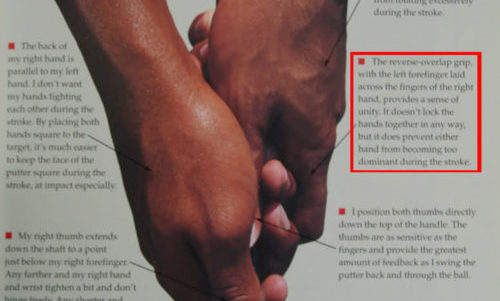
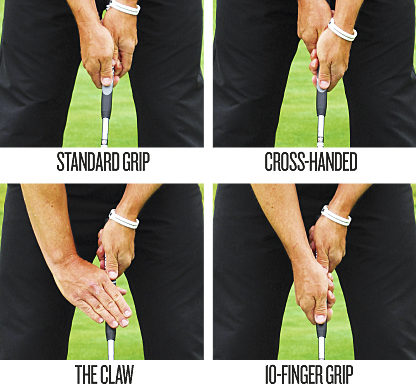
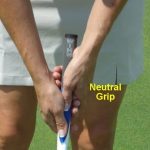
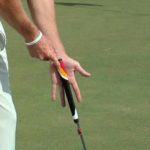
- THE GRIP (different from your full swing grip)
[/op_liveeditor_element]
[op_liveeditor_element data-style=””]

[/op_liveeditor_element]
[op_liveeditor_element data-style=””]
- BODY ALIGNMENT
[/op_liveeditor_element]
[op_liveeditor_element data-style=””]
[/op_liveeditor_element]
[op_liveeditor_element data-style=””]
- EYE ALIGNMENT
[/op_liveeditor_element]
[op_liveeditor_element data-style=””]
[/op_liveeditor_element]
[op_liveeditor_element data-style=””]
- HELPFUL OPTIONS
[/op_liveeditor_element]
[op_liveeditor_element data-style=””]
[/op_liveeditor_element]
[op_liveeditor_elements][/op_liveeditor_elements]
+
[op_liveeditor_element data-style=””][text_block style=”undefined” align=”left” font_color=”%23000000″]It is important to have balanced, structured practices based on your strengths and weaknesses.
The 60/40 improvement plan
I have to admit, I copied this formula during my time coaching at Ohio State University. On Sunday night we would have our players make a 60/40 plan for each day of the weak. They would break each practice down per day and 60(weakness)/ 40 (strength). This allows you to focus on improving the weakness while maintaining your strengths. Too many times, golfers are very 1 sided with their practice. You need to have balanced practices, in this case we are balancing our practice time on the putting green by working on both our strengths and weaknesses.
We will pretend you are doing this test on your own (test shown below has my notes while observing the student putt). I want you to pick out which distance seemed to be the weakness. In the example below, 4 foot putts scored lowest in relation to PGA Tour average. You will make this distance 60% of your putting practice until you retest and find a different result.
Practice Plan Example – Weakness, Short Putts
60% on short putts (7 feet and in)
40% on mid-range putts (15-25 feet)
Most likely, if you struggle on short putts it is due to deficiencies in your fundamentals. You will be automatic from short range if you have the 3 key fundamentals – Alignment (body and eye line), Solid hit (true roll/starting direction) and Pre Shot Routine (Mindset/Trust). Based on these 3 elements we are going to structure our practice to improve the first key fundamental – body and eye alignment.
[/text_block][/op_liveeditor_element]
[op_liveeditor_elements][/op_liveeditor_elements]
+
[op_liveeditor_element data-style=””]
[/op_liveeditor_element]
[op_liveeditor_element data-style=””][text_block style=”style_1.png” align=”left” font_color=”%23000000″]
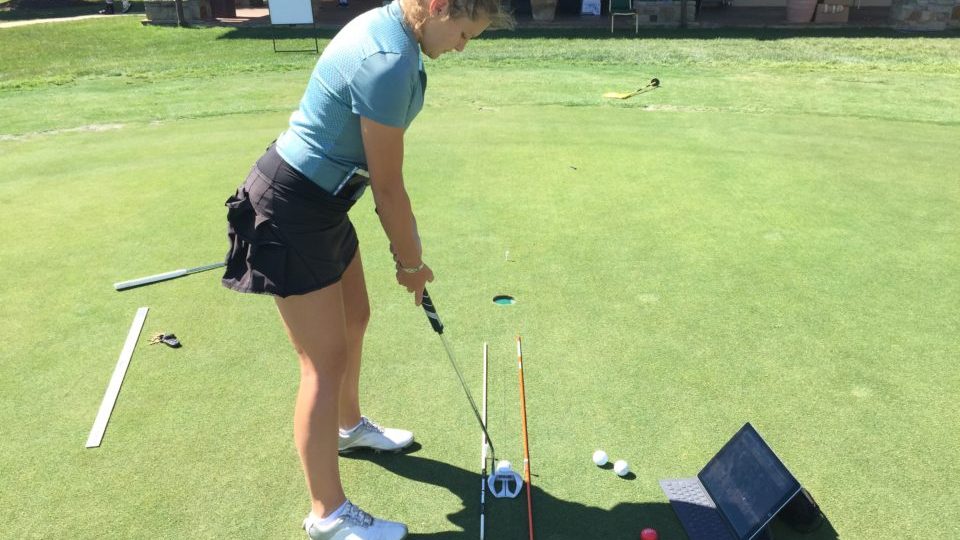
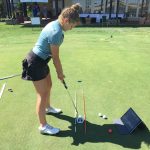
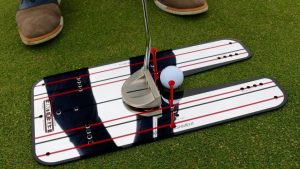
DRILL #1
Body and putter face alignment with sticks down, we can have a guide to perfect body alignment while having another stick down just outside the ball for our club face and path direction.
1. Find a straight putt
2. Place 2 alignment sticks parallel to each other, one on your feet and on for your path (see picture). Place a ball at the end of the sticks, roughly 4 feet from the hole.
BLOCK PRACTICE this would be an exception to what I said earlier about not hitting the same putt twice – in this drill you will hit from the same spot, but you will go through your routine each time. I want you to walk in from behind the ball like you would on the golf course to give yourself practice of how to setup and align correctly when walking up to the putt. Do NOT just stand in your set up position, raking over ball after ball.
OBJECTIVE ⇒ Make 10 putts in a row[/text_block][/op_liveeditor_element]
[op_liveeditor_elements][/op_liveeditor_elements]
+
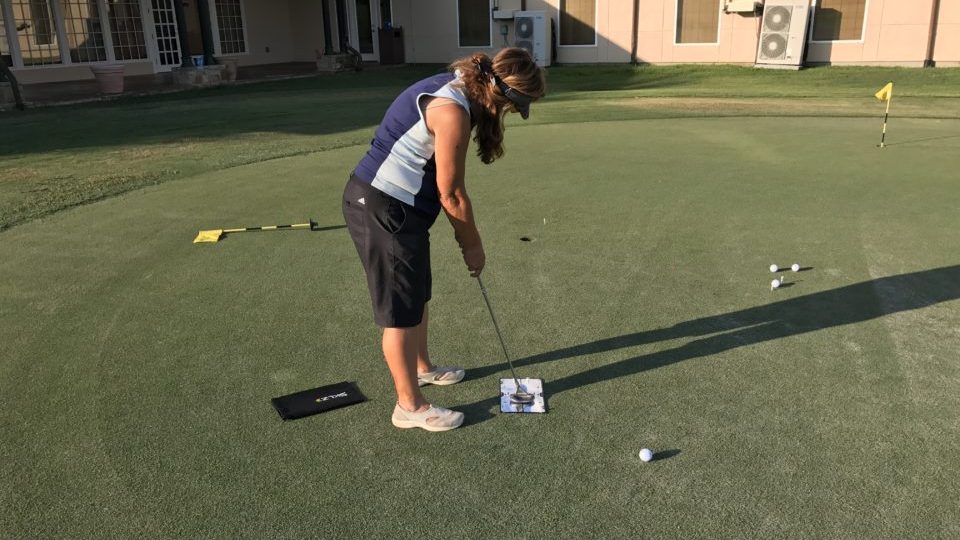
[op_liveeditor_element data-style=””][text_block style=”undefined” align=”left” font_color=”#000000″]DRILL #2
Eye Line I haven’t heard many people talk about eye line but it might be more important than body alignment. If you do not set your eye line correctly, you will miss align when you are on the course. Having your eye line match your target line is important for you to see your line while setting up over the ball to putt. If it is off you will either misalign or manipulate your putting stroke to adjust for bad alignment.
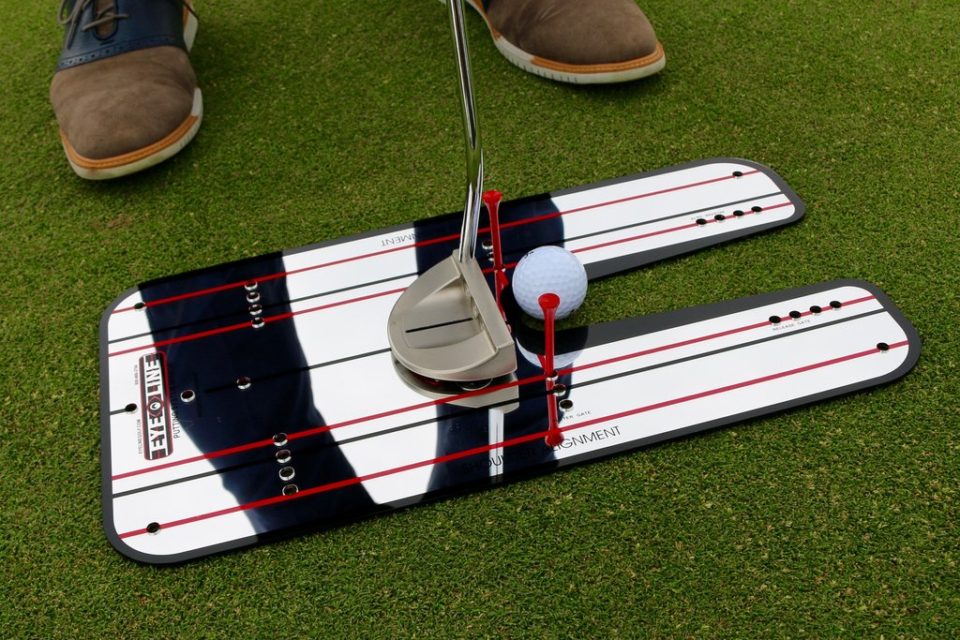
AT THE GOLF COURSE take your eyeline training aid and place it 5 feet from the hole on a straight putt. Pay attention to detail, make sure it is pointed down your target line.
PRE SHOT ROUTINE go through your routine, every putt! Set up like you did in the previous drill. Make sure your eye line is on the line or slightly inside the line with your eyes on the same line as the black line on the mirror.
OBJECTIVE ⇒ Make 10 putts in a row
[/text_block][/op_liveeditor_element]
[op_liveeditor_elements][/op_liveeditor_elements]
+
[op_liveeditor_element data-style=””][text_block style=”undefined” align=”left”]It is important to have balanced, structured practices based on your strengths and weaknesses.
The 60/40 improvement plan
I have to admit, I copied this formula during my time coaching at Ohio State University. On Sunday night we would have our players make a 60/40 plan for each day of the weak. They would break each practice down per day and 60(weakness)/ 40 (strength). This allows you to focus on improving the weakness while maintaining your strengths. Too many times, golfers are very 1 sided with their practice. You need to have balanced practices, in this case we are balancing our practice time on the putting green by working on both our strengths and weaknesses.
We will pretend you are doing this test on your own (test shown below has my notes while observing the student putt). I want you to pick out which distance seemed to be the weakness. In the example below, 4 foot putts scored lowest in relation to PGA Tour average. You will make this distance 60% of your putting practice until you retest and find a different result.
Practice Plan Example – Weakness, Short Putts
Based on our example baseline test, here is a structured practice to work improve your putting
60% on short putts (15 feet and in)
40% on all other putts (15 feet and longer)
Most likely, if you struggle on short putts it is due to deficiencies in your fundamentals. You will be automatic from short range if you have the 3 key fundamentals – Alignment (body and eye line), Solid hit (true roll/starting direction) and Pre Shot Routine (Mindset/Trust). Based on these 3 elements we are going to structure our practice to improve the first key fundamental – body and eye alignment.
Drill 1 – Body Alignment
BODY AND CLUB ALIGNMENT with sticks down, we can have a guide to perfect body alignment while having another stick down just outside the ball for our club face and path direction.
1. Find a straight putt
2. Place 2 alignment sticks parallel to each other, one on your feet and on for your path (see picture). Place a ball at the end of the sticks, roughly 4 feet from the hole.
3. Despite what I said earlier about not hitting the same putt twice – in this drill you will hit from the same spot, but you will go through your routine each time. I want you to walk in from behind the ball like you would on the golf course to give yourself practice of how to setup and align correctly when walking up to the putt. Do NOT just stand in your set up position, raking over ball after ball.
OBJECTIVE ⇒ Make 10 in a row before you are done.
Drill 2 – Eye Line
I haven’t heard many people talk about eye line but it might be more important than body alignment. If you do not set your eye line correctly, you will miss align when you are on the course. Having your eye line match your target line is important for you to see your line while setting up over the ball to putt. If it is off you will either misalign or manipulate your putting stroke to adjust for bad alignment.
AT THE GOLF COURSE take your eyeline training aid and place it 5 feet from the hole on a straight putt. Pay attention to detail, make sure it is pointed down your target line.
PRE SHOT ROUTINE go through your routine, every putt! Set up like you did in the previous drill. Make sure your eye line is on the line or slightly inside the line with your eyes on the same line as the black line on the mirror.
OBJECTIVE ⇒ Make 10 putts in a row
40% Maintenance Practice (Strength of Putting)
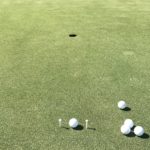
SPEED CONTROL we will focus on mid-long range putts 30 -40 feet. When hitting putts outside of 20 feet I recommend hitting to other targets rather than a hole. The reason being, PGA Tour players make less than 3 percent of putts from this range, which means you will watch nearly every putt you hit from this distance miss the hole – leading to losing confidence.
Drill 3 – Putting to the fringes
1. Take 3 balls and go to the center of the putting green
2. From the center, you can putt to all 4 sides of the green. Putt 3 balls to one side of the green. The goal is to get it as close to the fringe, without rolling into the fringe.
3. Repeat this process to the other 3 sides.
4. Complete this process 3 times for a total of 36 putts.
[/text_block][/op_liveeditor_element]
[op_liveeditor_element data-style=””]

PUTTING is very personal. Different grips, stances and crazy variations. Mindset is the most important.
IF YOU ARE A GREAT PUTTER do not change a think and keep the confidence rolling
IF YOUR PUTTING HAS ROOM FOR IMPROVEMENT there are a few aspects that can help you getting your putting back on track.
THE GRIP is different from full swing, should be in the palm of your hands, helping reduce rotation of the putter face, keeping it square.
SET UP unless you have a specific reason, you should set your body alignment square parallel to your club face/target line. Your eyeline should also be down your target line, over the ball to slightly inside the ball. How far inside… thats what the eyeline training aid shows you! roughly up to 2 inches inside the ball.

[/op_liveeditor_element]
[op_liveeditor_elements][/op_liveeditor_elements]
+
[op_liveeditor_element data-style=””]

[/op_liveeditor_element]
[op_liveeditor_element data-style=””]
MAINTENANCE PRACTICE
[/op_liveeditor_element]
[op_liveeditor_element data-style=””][text_block style=”style_1.png” align=”left”]Maintenance practice (40% of your practice time) is spent on your strength.[/text_block][/op_liveeditor_element]
[op_liveeditor_element data-style=””][text_block style=”undefined” align=”left” font_color=”%23000000″]SPEED CONTROL this drill focuses on mid-range putts 15 -25 feet. When hitting putts outside of 10 feet I recommend hitting to other targets rather than a hole. The reason being, PGA Tour players make less than 10 percent of putts from this range, which means you will watch nearly every putt you hit from this distance miss the hole, causing you to lose confidence.
DRILL #3 Putting to the fringes
1. Take three balls and go to the center of the putting green.From the center, you can putt to all four sides of the green.
2. Putt 3 balls to one side of the green. The goal is to get it as close to the fringe, without rolling into the fringe.
3. Repeat this process to the other three sides.
4. Complete this process three times for a total of 36 putts.
[/text_block][/op_liveeditor_element]
[op_liveeditor_elements][/op_liveeditor_elements]
Training Details
[op_liveeditor_element data-style=””][text_block style=”style_1.png” align=”left” font_size=”13″ font_style=”normal” font_color=”%23000000″]OBJECTIVE balanced putting practice
Outdoor practice with drills
60% of practice focused on 7 feet and in
→ Starting Line
40% of practice focused on mid range putts
→ Speed Control
[/text_block][/op_liveeditor_element]
[op_liveeditor_element data-style=””][text_block style=”style_1.png” align=”left” font_size=”13″ font_style=”normal” font_color=”%23000000″]PRACTICE TYPE(S)
→ Block Practice for fundamentals
→ Random Practice for speed control
→ Deliberate Practice for routine
[/text_block][/op_liveeditor_element]
[op_liveeditor_elements][/op_liveeditor_elements]
I use these practice plans and to prepare for my tournament season. In 2017 these practices helped me qualify for my first PGA Tour major at the 2017 PGA Championship, earn South Texas PGA Player of The Year and earn my second PGA Tour appearance at the 2018 Houston Open. Old school golf instruction has been confusing and redundant, my goal is to make game improvement simple and re-educate golfers on the truth of what actually works to get better quickly.
JJ WOOD PGA
Director of Instruction

[op_liveeditor_element data-style=””]
[/op_liveeditor_element]
[op_liveeditor_element data-style=””]
Eyeline Mirror
[/op_liveeditor_element]
[op_liveeditor_element data-style=””][text_block style=”style_1.png” align=”left” font_size=”13″ font_style=”normal” font_color=”%23000000″]This putting mirror is perfect for checking all parts of your putting alignment and setup. Check your eyes, shoulders, putter face & more. Consistency is key! Check your alignment, eye position and shoulder alignment.
The EyeLine mirror is the base of the ORIGINAL Putting system and is the perfect tool for checking all parts of your putting alignment and setup. Measures approx. 10″ x 18″ and is made from acrylic with slots cut for guide tees.[/text_block][/op_liveeditor_element]
[op_liveeditor_elements][/op_liveeditor_elements]
[op_liveeditor_element data-style=””]
[/op_liveeditor_element]
[op_liveeditor_element data-style=””]
Premium Putting Program
[/op_liveeditor_element]
[op_liveeditor_element data-style=””][text_block style=”style_1.png” align=”left” font_size=”13″ font_style=”normal” font_color=”%23000000″]7-day practice plan to improve all aspects of your putting. Program focuses on the most important aspects of putting to take your putting to the next level. Access all of the performance drills that tour pro’s do daily to improve their putting. Drills can be done at home or at the course. Coming Soon.
Please fill out form below and be notified when it becomes available[/text_block][/op_liveeditor_element]
[op_liveeditor_element data-style=””][javascript]PGA Optin: 7-DAY PUTTING PLAN, Coming Soon
[/javascript][/op_liveeditor_element]
[op_liveeditor_elements][/op_liveeditor_elements]
QUESTIONS? PLEASE FILL OUT THE FORM
(832) 736-4731

JJ Wood and golf training programs have been featured on major media outlets
